Techno Gadgets - Sony Vaio Pro 13, Specs and Price : the ultra lightweight ultrabook - Sony introduces the Vaio Pro .. ? To be the alternative to the Apple MacBook Pro? We'll see
[ Taipei ] Despite veto stay, Sony has been presented next to the Computex sneaking into the formal launch of Windows 8.1 (Blue) and declare the title of Windows 8 ultrabook world's lightest to the Sony Vaio Pro 13 and 1.06 kilograms .
Techno Gadgets - Galaxy Camera with 20.2MP: Appear on Google Plus a quantity of photos taken with the designed extra Samsung device - Found on Google Plus a trio of images in which it seems all schedule Samsung is closer to liberation a extra version of its Galaxy Camera with Android this day. The reference we gain of the camera with the purpose of gain made these photographs is Samsung Galaxy Camera EK-GC100, while the current camera is the EK-GN120.
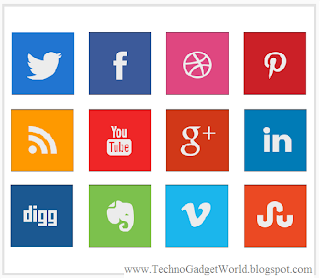
Social Media has become an important player in the way we communicate with friends, family and relatives. The blogging world is also moving towards social media to build up their blog community. Social Media presence have become important for every blogger, if they want to grow their blogging community and to achieve higher traffic for their blog. And, in turns it gives the users of your blog easy access to your blog's content.
So, let's see - How To Add Social Media Icons To Your Blog: Step 1: Before starting the work on adding social media buttons to your blog or website- you need to get the buttons first. You can get it free or you can buy also. I have downloaded the buttons as shown above in JPEG file format which are squared in shape. If you need round buttons they usually be in PNG format.
Step 2: Once having the buttons, you will have to upload it to Photobucket or any other similar site.
Step 3: Once uploaded, you need to get the URL's of your images now.
If you have uploaded your images to Photobucket, you'll can get the URL's of your images on the right hand side. Copy the URL from Direct Link Title content box.
Step 4: Go to your blogger Dashboard-> Layout-> Click on "Add a Gadget".
From the pop up window list, choose "HTML/JavaScript".
Step 5: Below is the code Skeleton- Fill all the attributes of the HTML Tag correctly.
[You can use Notepad/Word Pad to create all the HTML code and then paste it on the HTML/JavaScript Content box]
http://www.YourWebsiteAddress.com: URL for the address of your social media like Facebook,Twitter etc. For example: http://facebook.com/TechnoGadgetWorld
target="_blank": To make the page open in a New Tab.
http://www.URLofImageLocation.com: "Direct Link" URL address from PhotoBucket.
height="70" width="70": Dimensions for your Icon. Change it depending on your requirements.
Repeat all the steps one by one for every social media icon you add.
Step 6 : Click on "Save" button and "Save the Arrangement". Check your blog to see the changes and click each icons to make sure you have linked it properly. That's it. If you do the steps correctly you will be going to have the brand new look for your blog/website. If you have any doubts or suggestions, please do leave your comments below.
YouTube has created an advanced set of copyright policies and content management tools to give rights holders control of their content. YouTube provides content management solutions for rights holders of all sizes across the world, and provides tools to cater to the specific needs of various rights owners.
What is Content ID?
YouTube's state-of-the-art technologies let rights owners:
Identify user-uploaded videos comprised entirely OR partially of their content, and
Choose, in advance, what they want to happen when those videos are found.
Make money from them. Get stats on them. Or block them from YouTube altogether.
It's up to you.
Why use Content ID?
Make Money. Hundreds of media companies have signed up already, multiplying their inventory of monetizeable videos.
Fan Interaction. Turn your fans into marketers and distributors of your content—while letting them interact with their favorite content.
Reduce Infringement. Educate your fans about your copyright preferences and prevent your content from being distributed on YouTube without your permission.
Fully Automated. Once you're set up, Content ID will identify, claim, and apply policies to YouTube videos for you.
Market Data. Access snapshots of your content profile on YouTube, anytime. See how your videos are performing, monetizing, being blocked—at a glance.
Instructions on - How To Fill Form
1-Enter your First and Last Name
2- Country/Region (exactly place)
3- Phone Number
4- Your Blog or Website URL
5- Choose one for which describes your content the best
6- Tell them how many copyright do you exclusively control (that means how many articles or self-created thing you have in your entire life?)
7- You may be an individual, or Organization, whatever best describe your account
8- Have you issued a copyright take down notice (have you you ever issued a third party strike) tell true,because they check your channel whether can be trusted or not.
9- Where do you host or distribute your content
I Choose on my Website and YouTube.
10-Why do you want to choose content id program (select all that apply as mentioned)
11- I want to use content id to identify
I recommend you to select:-
Audio-visual content (video with an audio channel)
12-Please explain briefly why would you want to participate in Content Identification Program
A SAMPLE:
I do upload videos on various kind of animals. And, I also upload videos mostly of my vacations with my friends.
Tips:-
Try to explain more briefly ,never copy and past ,they may detect this and you will be rejected.Use strongly recommended words with high vocabulary.This may encourage them to get you started by next steps via email 13-Please Provide a representative list of copyrighted works under your exclusive control:-
I have created a blog/website and I do share my videos with explanation on my tutorials.
[Tips:-Never show blank space in step 12 or 13,write without leaving any line]
That's it. If everything will be perfect. There are good chances for your ContentID claim will get approved. best of luck.
If you have any doubts or suggestions, please leave your comment below.
Blogger Static Pages are same as post pages though they have certainly difference compared to post pages. The difference is Blogger static pages don't have a label, they don't appear in the blog's archive. Blogger static pages are pages that primarily used to write Contact Pages, privacy Pages, About Me pages etc.
But still, we can use this pages to provide external link to other parts of the blog or even totally to other blog/website. The main advantages of using Static pages is they do act like a part of skeleton of your blog. Therefore, the content of Static Pages can be accessed from any post or any part of blog. How you will be going to make use of it is only limited to one imagination.
So, let's check out - How To Create Static Pages In Blogger :
Step 1: Log in to your account and Click on Dashboard of your blog
Step 2: Click on Pages as shown below
Step 3: Click on New Page - > Blank Page as shown below
Step 4: Write the "Title of the page" and enter the page content
Step 5: See the Preview of the page on your blog before publishing
Step 6: After completing the editing, Publish the Page
Step 7: You do have 3 options:
Place the page Link in Top menu bar- Top tabs
Place the page link in Side menu bar- Side tabs
To enter page link manually on your blog- Don't show
Step 8: Now, save the arrangement
Your Static Page looks like as shown below
That's it. Now you have created your static page.
If you have any doubts or suggestions, please do leave your comment below.
Social networking sites has changed the way we communicate with our family, friends and relatives.
The same kind of affect is on blogs too. The blogging platform now has become too much social network oriented. To achieve the high traffic for your blogs and to have grasp the larger audience , the bloggers must have social media presence on the web for their blogs.
The Social Media Widget increases traffic and engagement with the world’s most popular sharing buttons for blogs. Normally, the Social sharing widget is at the end of the posts. The advantage of floating vertical social media share buttons is, they flow with content when the visitor scrolls the page. So, let's see - How to Add a Social Media Widget To Your Blog: Step 1: Go to your Dashboard of your blog Step 2: Click Layout -> Add Widget Step 3: From the list - Select "HTML/JavaScript" Step 4: Copy and Paste the below code in the "Content" section [NOTE : Leave "Title" section empty] <!-- AddThis Button BEGIN --> <div class="addthis_toolbox addthis_floating_style addthis_32x32_style" style="left:50px;top:50px;"> <a class="addthis_button_facebook"></a> <a class="addthis_button_twitter"></a> <a class="addthis_button_pinterest_share"></a> <a class="addthis_button_linkedin"></a> <a class="addthis_button_google_plusone_share"></a> <a class="addthis_button_stumbleupon"></a> <a class="addthis_button_compact"></a> </div> <script type="text/javascript">var addthis_config = {"data_track_addressbar":true};</script> <script type="text/javascript" src="//s7.addthis.com/js/300/addthis_widget.js#pubid=ra-51f184b5319b19ad"></script> <!-- AddThis Button END -->
Step 5: Click "Save" button. And, "Save the arrangement" of your blog. Visit the blog to see the changes. If you want social media buttons with count on them, please do check the below link. Click Here : How To Add Floating Social Media Share Widget With "Numbers" Count To Blogger If you have any doubts or suggestions, please do leave your comments below.
The first time when we signup and start our blog, the blogger provides us with basic default layouts and settings for our blog. For the person, who started blogging the layout may looks cool with all the handy features in it. But, as your blogging skills increases you start to get annoyed by the "Navbar" provided by blogger(as default).
The Navbar diminishes the professional look of your blog, yet being handy when it comes to provide you with Logging into your blog, publishing your posts, customizing your site.
To keep it or remove depends on one's own perspective.
In the following steps we will be going to see "How To Remove or Hide Blogger Navbar From Your Blog"- And, it is too easy to do.
Step 1: Go to Blogger Dashboard Step 2: Go to Layout-> Click Navbar -> Edit
Step 3: From the shown list of options select "off" option.
Step 4: Click Save. And you're done.
Now visit the blog and the Navbar has been removed from your blog.
So, do you think Navbar is useful or it is just a useless gadget. Please, share your valuable views and comment below.